At the end of the previous article, I shared steps to creating your first svelte app. Lets revisit. To create a New SvelteKit Project you can execute the following code in a terminal window (and agree to the additional dependencies recommended) :
npm create svelte@latest myprojectNavigate to the Project Directory:
cd myprojectInstall Dependencies:
npm installRun the Development Server:
npm run dev -- --openYour web browser will automatically open to the url http://localhost:3000. You should see your new SvelteKit app running.
However, there’s a lot more to developing an app.
Let’s discuss this in more detail.
A Svelte application, like any modern web application, typically has both front-end and back-end components. Both are critical for the functionality and both will have numerous dependencies and specific technology that come together to organize, execute, compile, and serve your data as a html webpage.
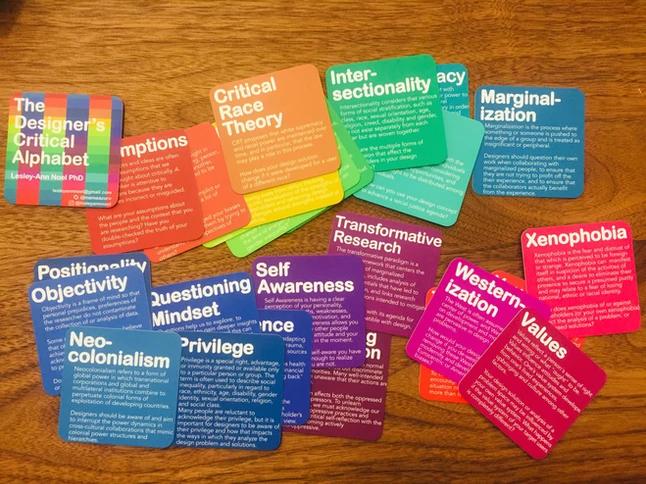
In this experiment we will be iterating and building a digital version of the Designer’s Critical Literacy Alphabet cards, a design learning and iteration tool developed by pluriversal designer, Dr. Lesley Ann Noel. We’ll push it one step further by creating an interactive environment for design teams to collaborate in real time using the cards as guidance. Let’s take a closer look at how this will work.
What is the Designer Critical Literacy Alphabet

From Dr. Noel’s website:
This deck of cards was designed by me to introduce designers and design students to critical theory and to help them reflect on their design process. There are 26 alphabet cards. Each card introduces theory under that letter. Then the cards introduce a question or comment to help make a connection to the theory and design practice.
The cards provide knowledge, like definitions of words and ideas that can impact or influence the design of a {product, service or solution}, and prompts for the design team to think about and explore. They are meant to be used with teams or students to encourage a more inclusive approach to defining and iterating the thing they are tasked with designing.
To create a digital version of this app we’ll need:
- A webapp that is built in Svelte using Sveltekit framework.
- A simple and functional CSS library. For this experiment, I’ve chosen Pico, a lightweight yet versatile library.
- A content management system (CMS) that allows us to build and store content. We will use Sanity, a headless CMS with particular features to support an app like this.
While these are the foundational tools to help us display the cards, we’ll want to also include a method to allow a team to collaborate in real time to select their cards and discuss them in a group setting. To do this let’s also:
- Create a Google Firebase project to manage users and authentication
- An interactive webpage to select 3 or 4 design cards
- A chat/video conferencing feature to allow logged in teams to chat and respond to card prompts. For this, we’ll use two popular opensource tools: socket.io and WebRTC. These allow for real time connections on-network or online.
Our app idea is growing and can get a bit overwhelming. So let’s just focus on setting up the app structure today.
Create our App Structure.
Keep in mind how you structure your Svelte and Sanity installations. They should follow like this:
-AppRoot
  -svelte App
  -Sanity CMS
Create your root folder and a skeletal Svelte App then proceed to setting up Sanity.
To use Sanity, you’ll need to have Sanity Studio version 3 installed, You can install this globally using the following:
$ npm install -g @sanity/cliThen install a new the Sanity CLI
npm create sanity@latestSteps to do so:
- Follow the steps to create a skeletal Sveltekit app.
- Make sure you select all recommended dependencies and tools.
- Go back to the app root and create a folder named “content”
- Now install Sanity CLI using the steps established above.
Now you should have a basic app structure set up. Check out Day three for how we’ll bring all this together. Since Sanity and Svelte both require you to launch them individually, you can use a simple bash script to do this from the root folder.
In the root folder, create a new file named “run-all.sh” and paste the following code, updating the names to the names of your app folders.
#!/bin/bash

# Navigate to the second package directory and run npm command
cd {your svelte folder}
#npm install
npm run dev -- --open &

# Navigate to the first package directory and run npm command
cd ../{your sanity folder}
#npm install
npm run dev &

# Wait for all background processes to finish
wait
This script will enter each of the folders and start the app services. To run it, simple target the file from your terminal
./run-all.shThis will start both Sanity and Svelte development services in one go.

